


So you want to build a cheap new computer PC in Australia in 2022 but you don’t know where to start. Building a cheap modern PC can be a daunting experience but with this step-by-step procedure, it doesn’t need to be.
You can save hundreds of dollars not buying a ready-made PC and just buying the individual parts yourself from places like MSY and then building it. Shouldn’t take more than an hour and can be a fun learning experience for yourself and maybe your family. This PC Build is for my parents so no use for a high-end graphics card making the build cheaper. You can find the MSY parts price list here.
Table of Contents
The main parts of the PC Build are as follows
Updated Australian parts list 2022
-
- APU: AMD Ryzen 5 5600G with Wraith Stealth 6C\12T-G7 $279
Mobo: B550M DS3H $98
RAM: (2x8GB) DDR4-3600 CL18 $105
SSD: Kingston 500GB A2000 M.2 NVMe $78
GPU: (Vega 7-8 cores integrated in the APU) (Only capable of low-medium detail, upgrade later with a dedicated GPU)
Case: Thermaltake Versa H18 $59
PSU: Silverstone 500W 80+ Bronze $59
- APU: AMD Ryzen 5 5600G with Wraith Stealth 6C\12T-G7 $279
- Operating System –
Windows 10 or 11
It’s always good to have all your parts written down before going to a PC shop to buy parts. It’s also a great idea to have alternate parts just in case the parts you require are not in stock. Take for instance the motherboard I wanted was the MSI B550M DS3H. This was not in stock and so I had to spend a little more and get The GIGABYTE B560M DS3H V2
Thermal Take Versa H15 Case Review
Check out the Video A quality PC build using the Versa H15 Case thanks to NotYourAverageHuman
Mounting Motherboard:
 The first step is to unpack the PC case from the box and to open it up by taking off both sides of the case. It’s always good to wear an earth strap when working with electronics. If you don’t have one just touch a metal object that is grounded before working on your PC to remove any static build-up on your body.
Next, Find the sand-off screws and screw them into the pre-drilled screw holes on the case as shown in the picture below. The standoffs are gold in color and these are what the motherboard screws on, to stop from shorting out on the case.
Mounting Cpu and Ram
I like to mount the CPU and Ram with the motherboard still outside the case, It’s just easier and you get less flex in the board while mounting. Especially the CPU cooler which can be hard to install at times.
-
- First, open the CPU latch and remove the CPU cover off the motherboard, be very care full not to bend pins on the motherboard.
-
- Next, carefully insert the CPU into the slot the Triangle notches lined up on the CPU and the motherboard.
- Use your finger to slide over the silver CPU cover to latch into the little screw on the bottom. Now the lever can be closed and latched into the hook. It takes a bit of pressure to latch so don’t worry.
CPU Cooler Install:
The CPU cooler is very simple to install. Just look for where the CPU power fan connector is and turn the cooler so the cable reaches.
Next, place the cooler on top of the CPU and gently push the 4 pins into the motherboard holes. You will hear 2 clicks per hole or 8 clicks total. This means the CPU cooler is now secure on top of the CPU. I do this on the static package it came in with a towel on the floor. It’s now time to screw it into the PC case. All the screws for the case will be included when you purchase the case.
Wire it all up, PC Build:
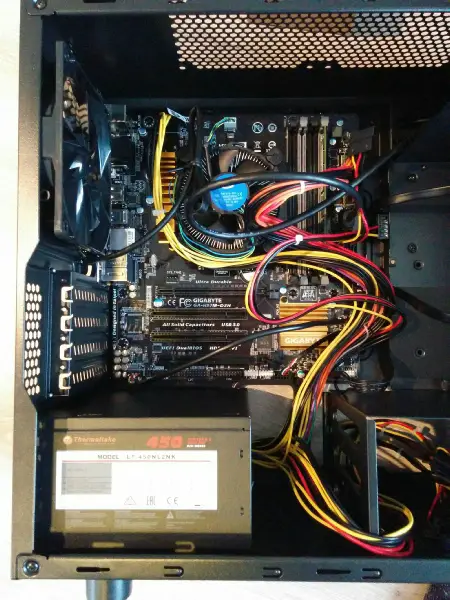 Wiring the rest of the PC is straightforward. The power supply has 3 main connectors to use.
-
- The Motherboard Connector, The CPU connector, and the Hard Drive Power connector.
-
- Then plug in the case connectors. These are pre-wired into the case so just need plugging into the motherboard, they include the USB and sound front headers.
-
- Next is the Power switch, Power reset, and LED lights for HDD activity, your motherboard manual will give you more information about where these go.
- If you have an external graphics card then it may need its own power connector.
- Next wire in the solid-state drive and plug-in any external HHD using a SATA cable. If you are only using an HDD or solid-state drive then plug the SATA connector into port 1 on the Motherboard.
Power it up with the Windows 10 USB in the back slot and install Windows, the full install procedure is here. Congratulations you have built your first PC. How to build a PC is easy once you know what to do. Now go out and build some more for friends and family you may be able to make some money on the side.
If your PC fails to boot then check if the display is working correctly. I had an issue where there was no display with the graphics card plugged in fix. There are a number of issues to check but often it may just be a bios setting.
Also, see how we got this cheap homemade PC to run Call of duty Black Ops 3

I am a qualified Industrial Electrician for the past 20 years and I love to share my knowledge on home repair and maintenance jobs.
I love fast toys like Motorcycles, Cars, Jetskis, Boats, and Computers so writing about them is easy. Working on them is fun.
To keeps costs down I do all my own mods, repairs, and servicing. These skills I want to share with everyone. DIY is a skill everyone can learn.


